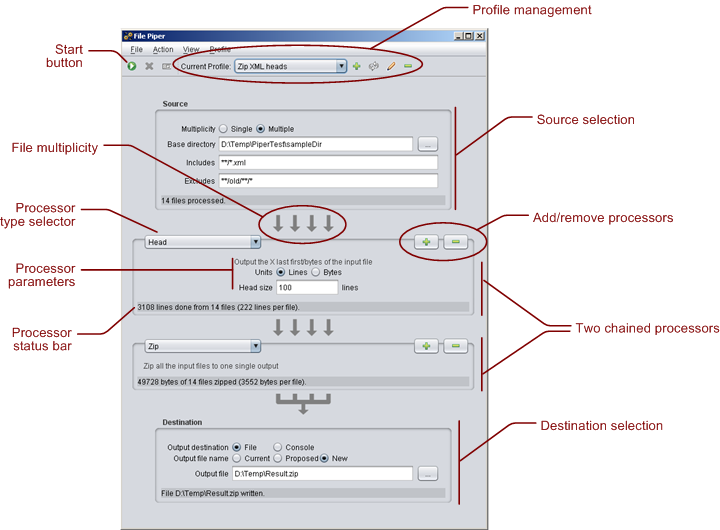

The file piper user interface contains the following parts:
each component of the pripeline is surronunded by a "titled border" and provides a status bar. The components are linked by gray arrows showing the multiplicity (one or many) of the files that will be transferred.

In the example screenshot above, there are two processors: the 'tail' processor and then the 'zip' processor. You can see that the zip processor changes the file cardinality to one (as it groups all the input files to one output file) so in the destination section of the pipeline the GUI asks for one target file.
The main toolbar actions are:
A profile is simply a pipeline definition stored in the application settings. If you have setup a pipeline that you want to reuse later, just click "store profile", give it a name and it's done. Later you will be able to choose the saved profile in the "current profile" combo-box to restore the stored pipeline.
Note that, in addition to the profile management, the File Piper automatically restore its last state at startup.
The source for processing can be a single file or multiple files.
The includes/excludes works like in apache-ant file sets. You can use the following wildcards:
You can put in the include and exclude fields several patterns separated by commas.
For example:
| includes: *.java excludes: |
Includes all java file of the base directory |
| includes: **/*.java excludes: |
Includes all java file inside the base directory and all sub-directories |
| includes: excludes: **/*Test*/** |
Includes everything except the directories with name containing 'Test' (the sub-directories of those test directories are also excluded |
| includes: **/*.java, **/*.xml, resources/** excludes: **/.svn/** |
Includes everything java and XML files in addition to all the files below the 'resource' directory but exclude the files that are under a '.svn' directory |
Note that, unlike apache-ant, the File Piper doesn't define default excludes. If you want to exclude some commonly excluded files or directories (like temporary files or source control data files) you have to specify it explicitly in the 'excludes'.
Tip: If you want to know exactly which files will be processed, use the 'List files' processor with 'Console' as destination. It will show to the console the list of selected input files.
Using the '+' and '-' buttons you can add/remove processor. The type of each processor is chosen in the combo-box of the 'titled' border.
The processor box contains a short description of the processor, input widgets to configure processor parameters and also a status bar to report processor progress during file processing. The meaning of those parameters and the exact displayed output depends on the implementation of each processor.
You can choose to write processed data to files or to the console. The written data is exactly the same in the file or in the console, except that for each file written in the console a line containing the proposed file name is added.
Obviously, the console is best suited for short text files (like output of the 'Search' or 'List files' processors).
If you choose 'file' output, depending on the output multiplicity you will be presented with different choices: